Taking on a major Airstream renovation was NOT part of the plan for this winter. We thought we would rent a house in the Keys, enjoy time on the water and stuff ourselves with tropical fruits and fresh fish all while visiting with friends and family. Nowhere in that plan was “remove everything from our home and rip out the walls and floor.” But a funny thing happened after only a few days of living in our rental house. We started to realize that if we were going to continue living in the Airstream we really needed to make some much-needed changes.
There were a few large projects that we had been talking about for years but simply couldn’t do while it was our only home. We also had a pretty significant list of small changes and fixes that we wanted to make. Since for the first time, we not only had an alternative place to live but also a nice covered area under the house to stage our projects, and access to tools that we might not have from my dad and his local friends. So we made a list, created a rough schedule and went for it.
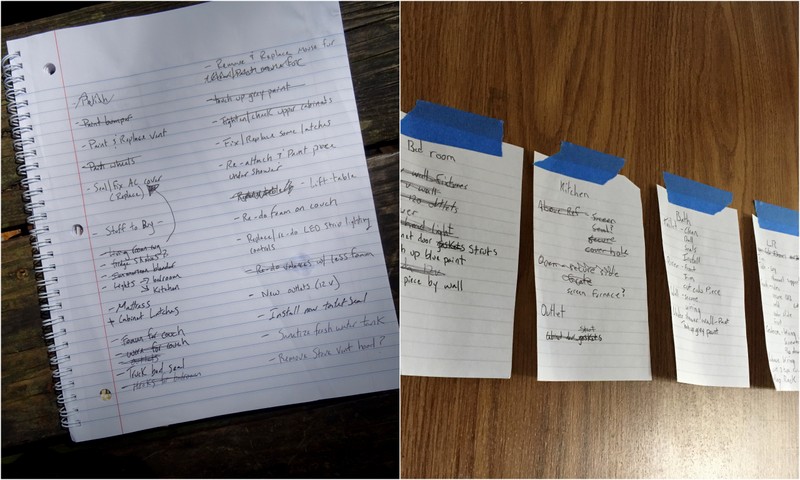
Lists, lists, and more lists
In the end, we did a pretty good job of balancing fun stuff with renovation projects. I will admit though, that our last month in the Keys was skewed pretty heavily toward the project side of things. It was worth it as our little house on wheels is now better than ever and we’re excited a about all the awesome places it’s going to take us over the next few years and beyond.
A little note before we begin: This is a really, really long post. Feel free to skip over the sections that don’t interest you. I won’t be offended, I promise. Also, this is not a detailed how-to for each project. Instead, I will share before and after photos along with some of our methods and what we learned along the way. If you want more info please don’t hesitate to ask in the comments or send us an email.
No More Mouse Fur Walls
Up until sometime in the mid-2000s, Airstream lined the interior walls of some of their trailers with a carpet-like product called Ozite. It’s more commonly referred to as “mouse fur” for reasons that become apparent when you “pet’ it. Mouse fur walls are fairly common in the RVs. Not only is it cheap to install but it has a reputation for durability and resistance to mold and mildew. Unfortunately, it also has a tendency to stain and develop unsightly black marks — especially in areas where it gets wet for prolonged periods. In the past, both our large windows in the front and rear of the trailer had leaks that caused the mouse fur to turn an unsightly black color. The mouse fur had also developed small black spots caused by the aluminum dust that had shaken loose and stained through the walls.
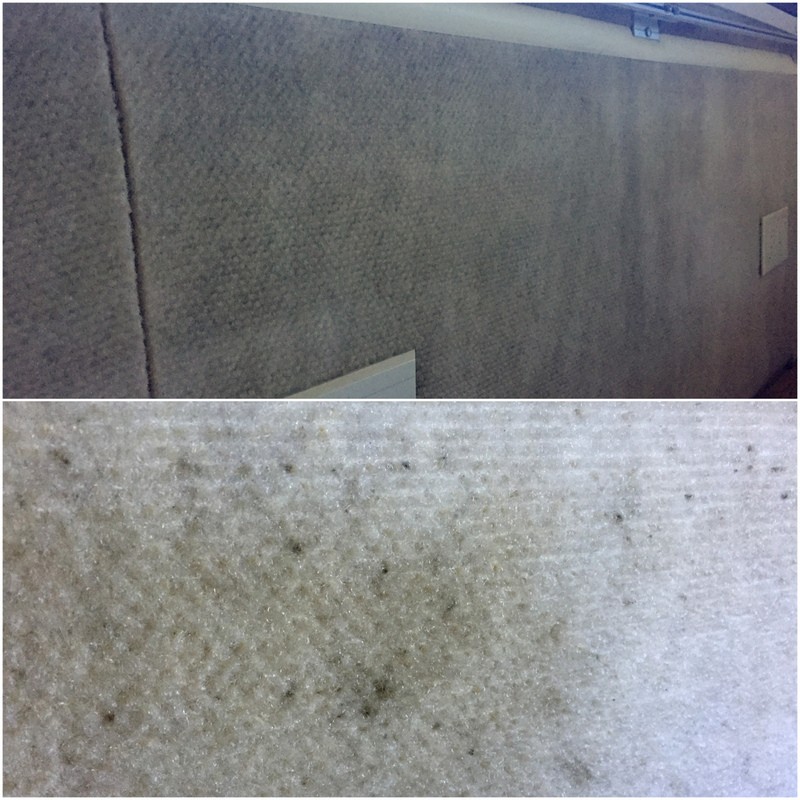
Yup, that stuff has got to go!
I found some information on Airforums.com from people who had solved this problem by steam cleaning the walls and even one guy who painted over the mouse fur. Back when we first got our Airstream I had some luck cleaning the walls, but at this point, they seemed too far gone for that method. And even if I had gotten it clean how often do I really want to rent a carpet cleaner for my walls??? I also tried the painting method, but I didn’t have a paint color that matched exactly so it looked terrible. What we really wanted to do was rip it out and replace it. But with what?
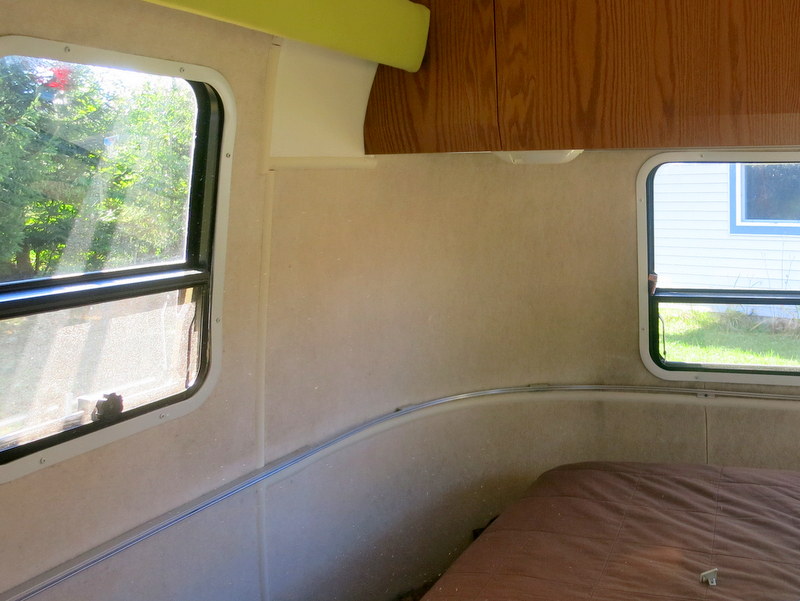
Without the curtains, you can see just how much mouse fur there is to replace
Newer Airstreams have an interior clear coat covered aluminum skin that looks awesome, but we knew that wouldn’t be a DIY project and our chances of finding someone to do that for us in the Florida Keys were slim to none which took that idea off the table. Simply polishing the aluminum under the mouse fur walls was also not an option as it’s very uneven with large gaps and overlaps that no amount of polish could have improved.
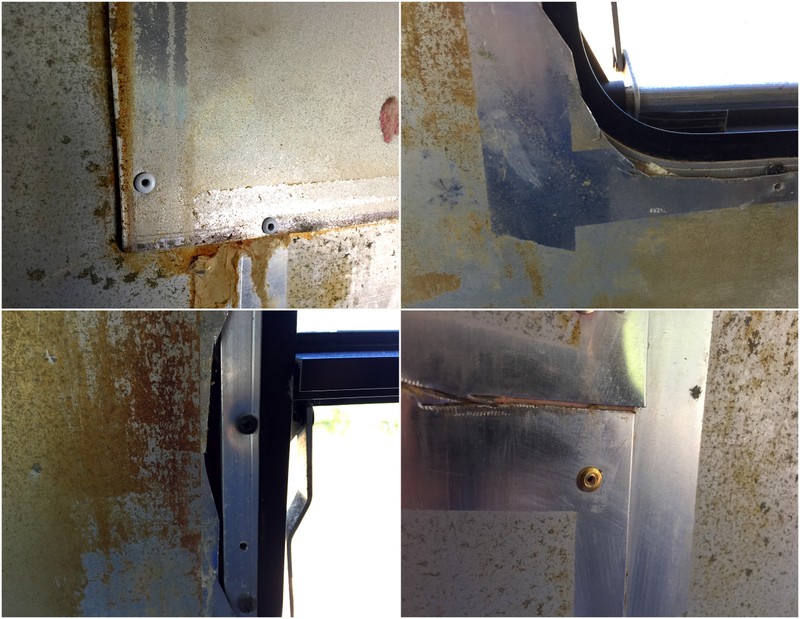
Underneath the mouse fur walls we discovered lots of overlaps and uneven cuts
We also could have replaced the old Ozite with new Ozite, but to be honest we don’t really like the way it looks. Finally, in a moment of inspiration, we decided to use a foam backed vinyl similar to what we have on the ceiling. The ceiling in our ’99 Airstream is original and in great shape. It’s also easy to clean and thick enough that it would cover all the imperfections underneath.
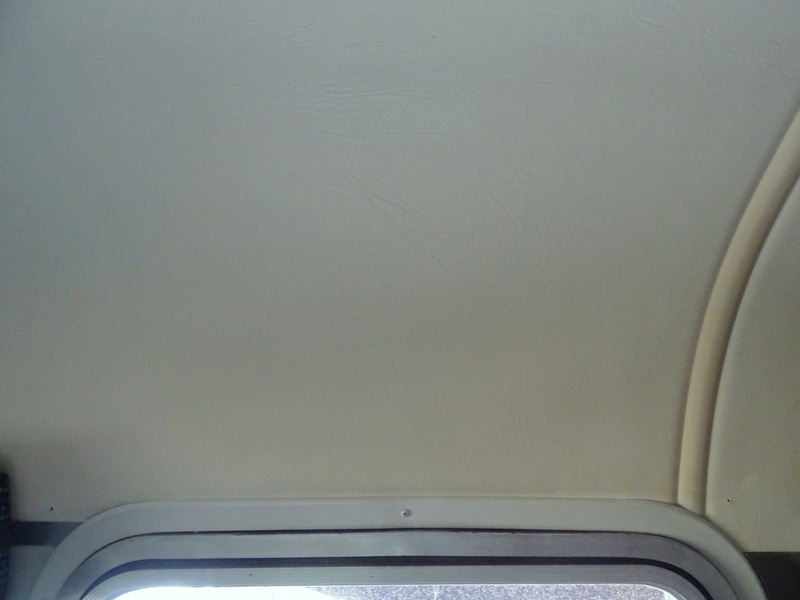
We kind of like this ceiling
Finding a vinyl that matched the color of the 18-year-old vinyl on the ceiling was going to be impossible so we decided to go with a different color altogether. Since we wanted a cool, bright look a pale gray was decided upon. We found a couple different marine supply places that sold the vinyl and ordered a bunch of samples. The winner was a light gray with a small pattern from a company called Great Lakes Skipper. We ordered a 16-yard roll and got to work removing the old mouse fur. *Because so many people emailed to ask about the vinyl we used, here is a direct link to the specific vinyl: https://www.greatlakesskipper.com/spradling-103236-corral-elk-grey-54-inch-1-4-foam-back-outdoor-marine-vinyl-fabric-boat-auto-upholstery-yd
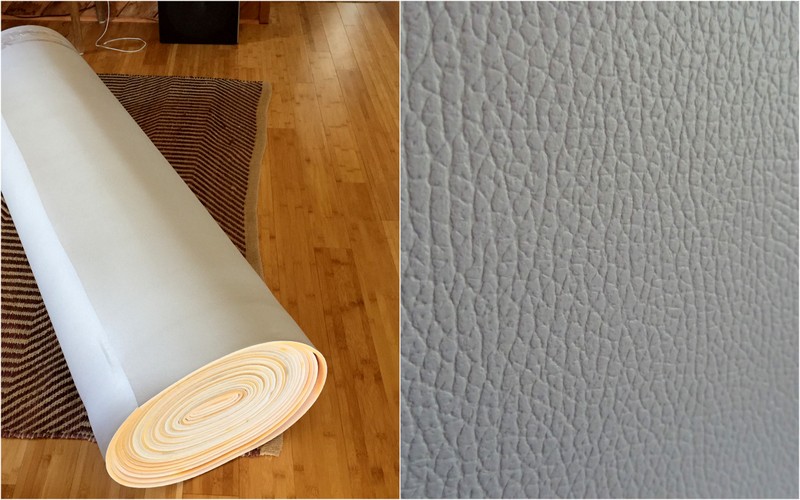
Our new walls all rolled up and a close up of the pattern
The mouse fur walls were very easy to remove. We simply found a seam and pulled. The glue underneath was completely dry and didn’t put up much of a fight. The most time-consuming part of removal was taking down all the valances, curtain tracks, hanging cabinets and anything else on top of the walls. We quickly realized that the mouse fur walls were installed before anything else inside the Airstream and as a result, everything was screwed or glued on top of them.
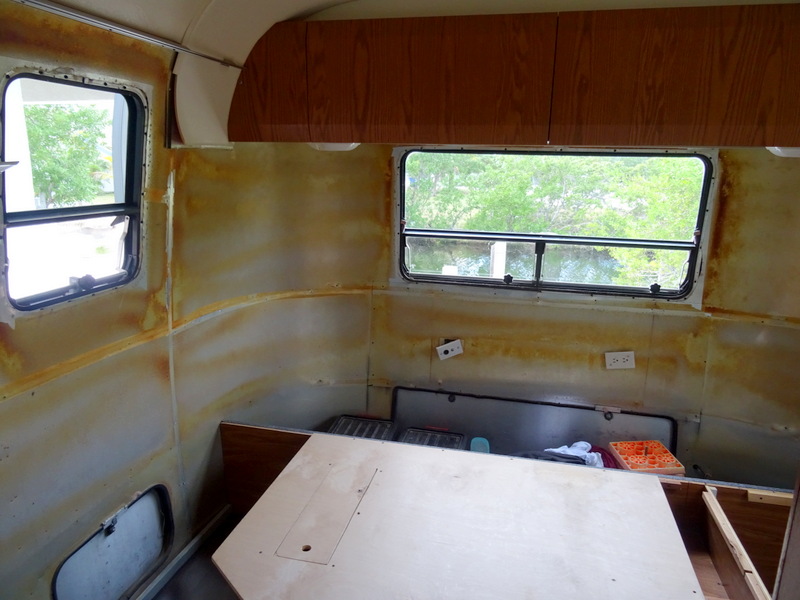
Mouse fur walls are gone! The bed platform and outside compartment items were removed soon after this photo was taken
Because we didn’t want to junk up the outside of our rental house too much we decided to tackle one area of the Airstream at a time which allowed us to shuffle the removed items around as we worked. We started in the bedroom and removed everything from the walls, the hanging cabinet, the bedside table, and the bed platform. In other words, everything except the upper cabinet on the back wall that we couldn’t figure out how to take down. We also had to find a place for all the stuff that we store under the bed in addition to the items that live in the compartments under our bed platform that are accessed from the outside. Some of it came upstairs in the house and some we piled under the carport, but most of our bedroom ended up in the living room.

There’s a living room somewhere under all that stuff
It was at this point that we decided we might as well replace the floors while we had everything out, so they got ripped out too. With everything empty, I set about removing the dried up glue that had held up the mouse fur walls. I used a product called Citristrip. It’s the same product we used years ago when we stripped the peeling clear coat from the outside. Except outside you paint it on, let it sit, then spray it with a high-pressure hose. Since that’s not possible inside I had to scrap it off using a variety of tools. It was smelly, messy and not very effective.
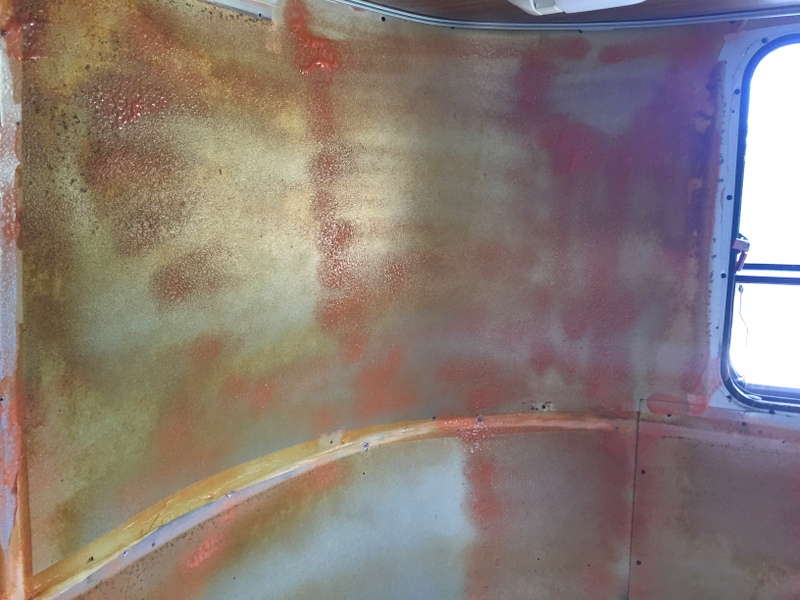
My attempt at removing the old glue with a coat of Citristrip
I did get most of the old glue off but decided that it probably wasn’t worth the effort and when we got to the front we simply left the old glue in place. I’m happy to report that method worked fine and removing the glue was not necessary. Not so happy that I spent so much time trying to remove it in the bedroom, but I guess you live and learn.
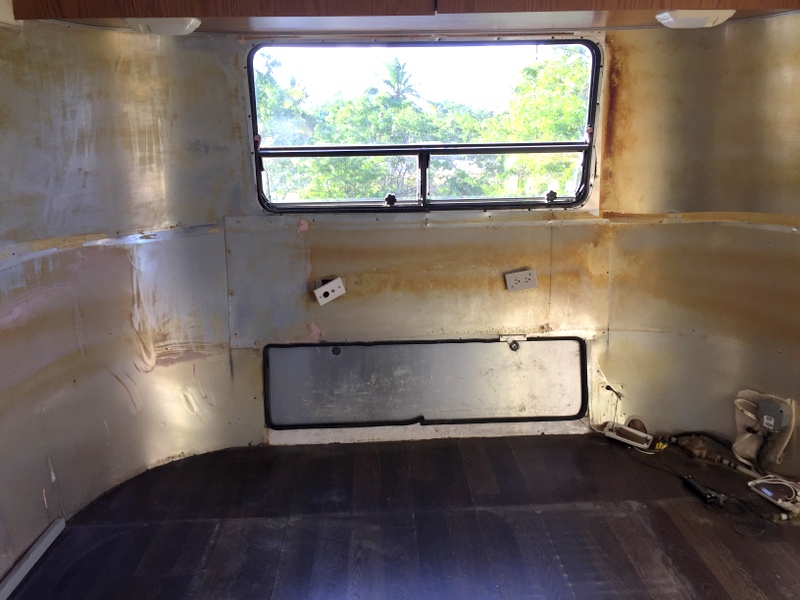
Empty bedroom with most of the old glue removed
Now that the walls were clean and empty it was time to put up the vinyl. We had watched a YouTube video of someone installing foam backed vinyl in their sailboat cabin and had a pretty good idea of how to go about it. The challenge was going to be the curved section of the walls. Not only do the walls curve around the corner but it they also curve inward making it difficult to stretch and attach the vinyl without creating wrinkles. After a bit of trial and error, we figured out that we had to cut the piece that would cover the curve into a top and bottom section. This allowed the vinyl to wrap around the curve without wrinkling. The first piece had to come off and be redone, but we eventually figured it out and by the time we did the living room curves it was a snap.
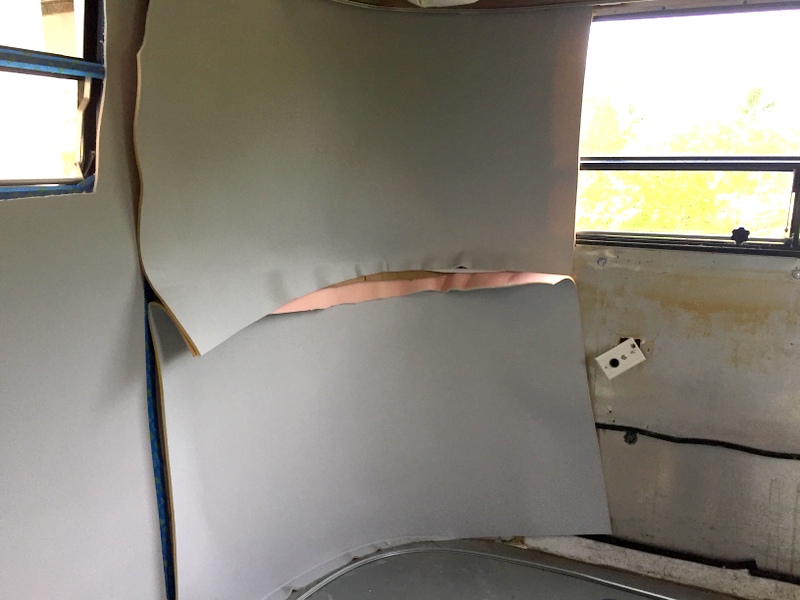
The curved section required two pieces
Again, this is not a step-by-step how to, but the general method we used to install the vinyl was to divide the wall into reasonable size sections, cut vinyl pieces a few inches larger than needed on each side, and then stick them on with a spray adhesive. We started with a 3M 77 Multi-Purpose spray adhesive and had some issues with it sticking that led to us re-gluing a few spots. Once we switched to 3M 90 Hi-Strength we had no issues.
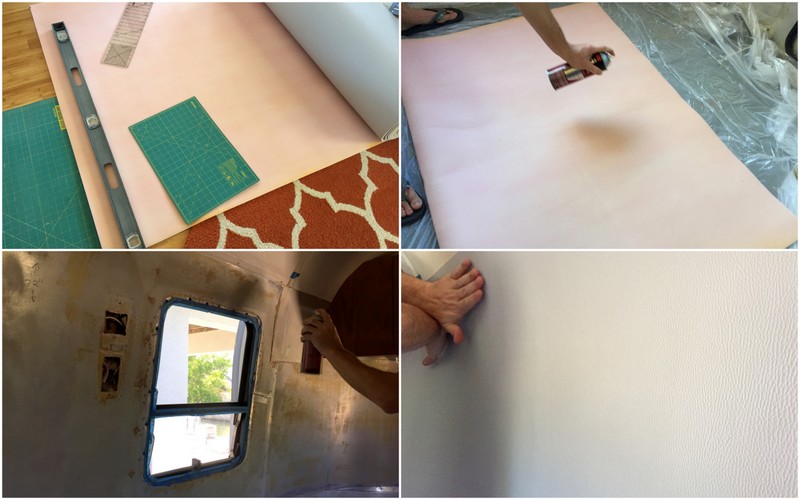
Measure & cut – Apply glue – Stick to walls
The final step was dealing with the edges and seams. Fortunately, we were able to easily tuck the edges of the vinyl behind the wood walls and cabinets. The metal window frames nicely covered the edges around the windows.
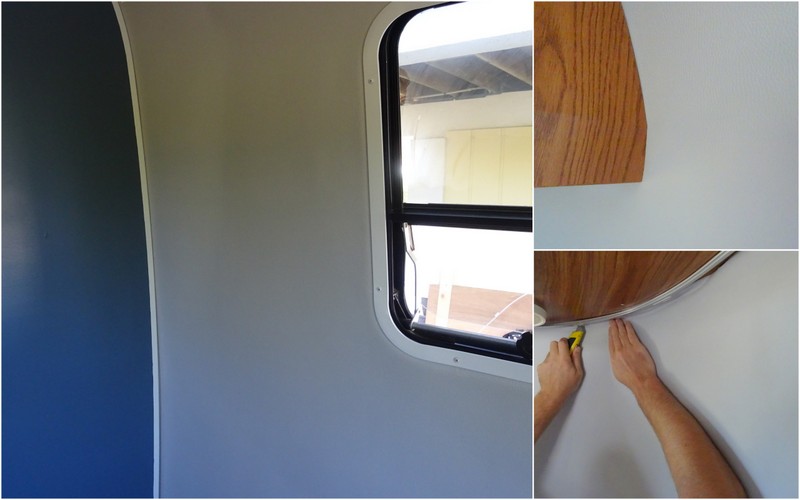
The vinyl edges tucked behind walls & cabinets and were covered by the metal window frame
The seams where the pieces of vinyl met were cut and covered with aluminum strips. This was something we agonized over for a long time. The seams of the mouse fur walls and our vinyl ceiling were covered with a two-part plastic strip. The bottom was a plastic track riveted to the aluminum and the top strip snapped on top. We probably could have sourced and used this product, but frankly, it’s kind of ugly and the chances of us finding it in the same color as the gray vinyl was slim.
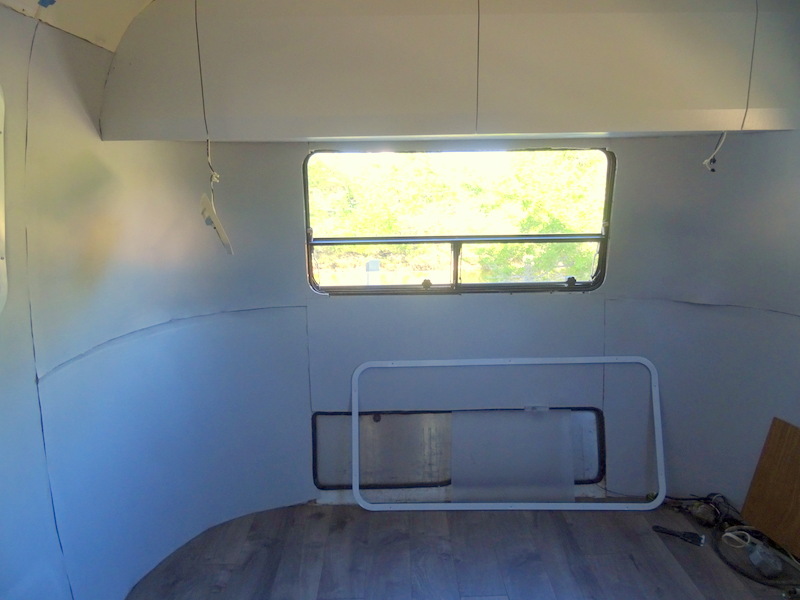
Extra vinyl cut and the seams ready to be covered
After wracking our brains Tim came up with the idea to use thin aluminum strips. We found a few online places that carried 1-inch aluminum strips with a clear coat finish, but the amount of shipping were going to have to shell out to get it delivered was ridiculous. Instead, we purchased raw aluminum strips from the local Home Depot and hand sanded them to a brushed metal finish.

Aluminum trim strips
The strips were cut to size, placed on top of the seams, and riveted in place. It looked way better than we ever imagined! We had planned ahead so the horizontal seams in the vinyl would line up with the bottom of the curtain track. That way we were able to bend the aluminum, place it along the seam and install the curtain track right on top. To secure the horizontal trim under the metal curtain tracks we used screws instead of rivets because the rivets kept popping out. In the end, it looked amazing and we were kind of sad that so much would be covered by the curtains.
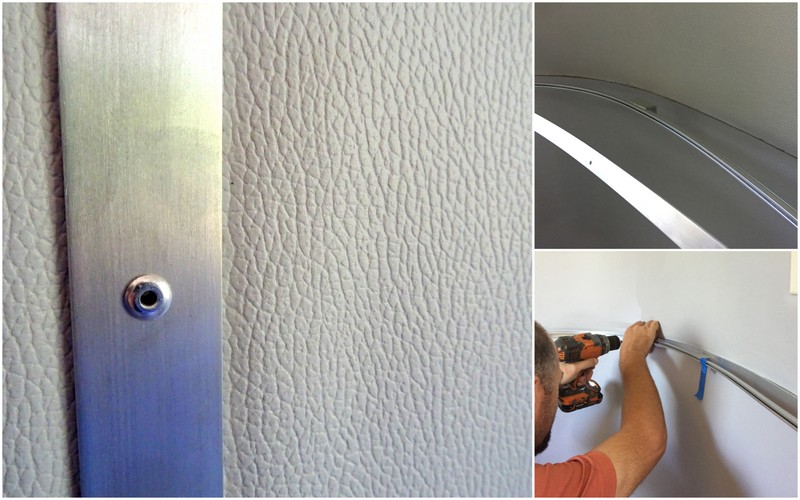
Aluminum trim gets riveted and screwed in place
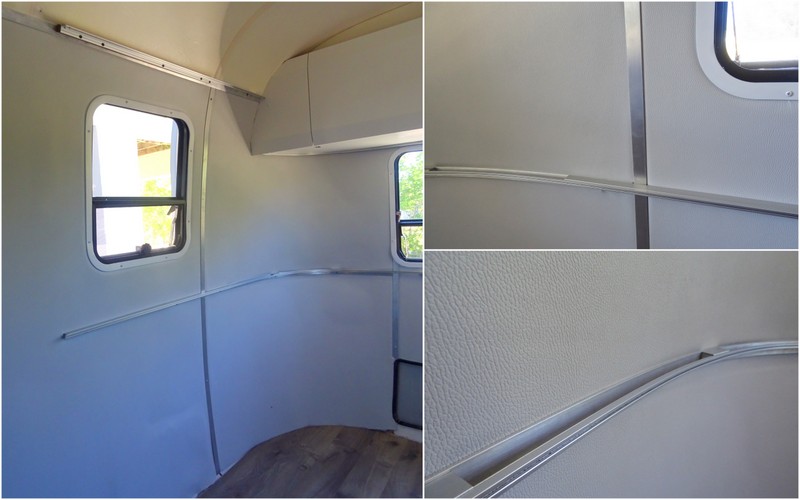
Bedroom walls and trim done!
After finishing the bedroom, we put everything back in and started removing furniture from the living room to repeat the process. Luckily, the middle of the Airstream is either wood paneling or the metal tile backsplash that we installed in the kitchen (it was originally a lovely gold fern patterned wallpaper) so we only had to replace the mouse fur walls in the bedroom and living room.

With the bedroom done it was time to move all the stuff out of the living room and into the hallway and bedroom
Since we had perfected the method in the bedroom the living room was much easier and it only took us a few days to install the new walls. The final steps were putting back up all the curtain tracks, reinstalling the window frames (that got a fresh coat of paint), valances (that got a new look with a thinner more streamlined lining), and wiring up the outlets.
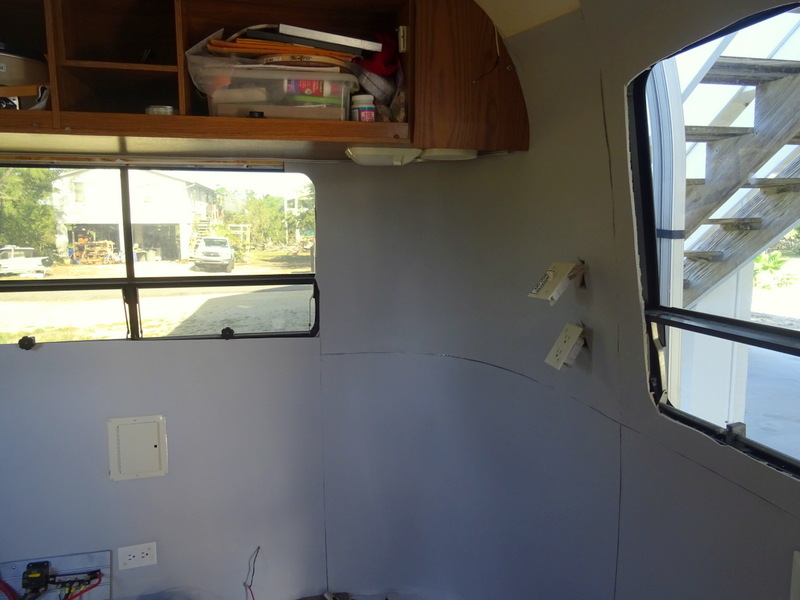
Vinyl walls up and ready for trim in the living room
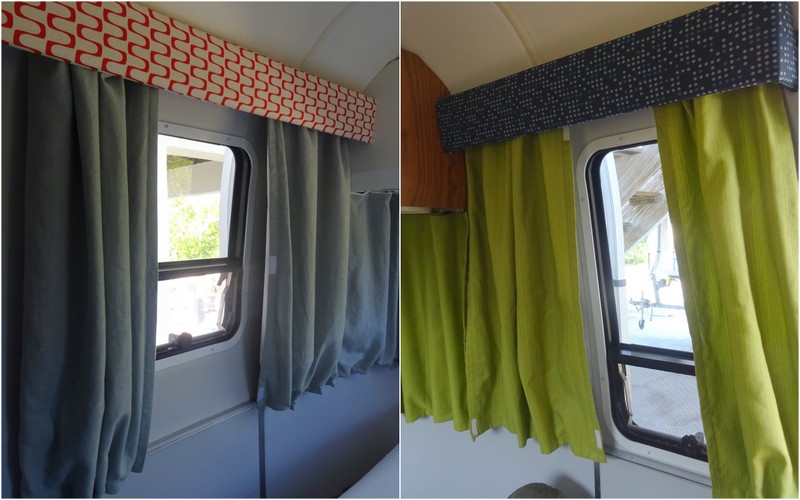
Curtains and valances back up in the bedroom and living room
New Laminate Floors
As I mentioned above once we removed everything from the bedroom we decided to go ahead and replace the floor. This was actually our second time replacing the Airstream floor. When we purchased it the original baby blue wall-to-wall carpet was still in there. As you would expect it was stained and gross. Who thinks putting carpet in an RV is ever a good idea? So we ripped it out and replaced it with a dark brown laminate floor.
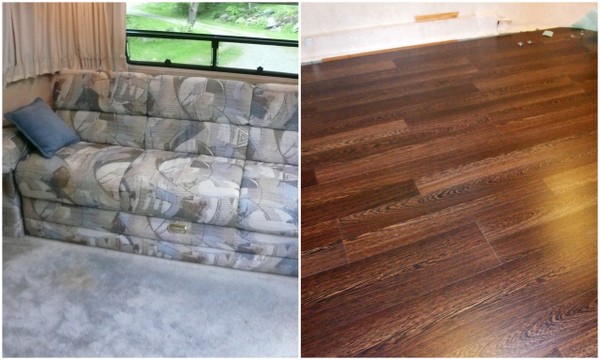
The original carpet and the first round of dark brown laminate – also, check out that lovely couch!
At the time we thought dark brown would hide the dirt (in reality it only highlighted every speck of dust) and contrast nicely with the fake oak cabinets (more on those in a minute). The problem was that we chose the floor based solely on color and didn’t pay attention to the brand or quality. Which was a huge mistake. We had previously installed a Pergo brand laminate floor in our Vermont house and always marveled at how incredibly durable it was. We thought all laminate floors were the same — they are not. From day one the generic brand floor (I don’t remember the name) that we installed in the Airstream was susceptible to dings, scratches, and scuffing. Simply looking at it the wrong way caused the finish to scratch and as a result, we had a number of unsightly imperfections. We had wanted to replace it for a long time, but since the floor was underneath all the furniture that was no easy task.
(I failed to take any close up shots before we ripped it out, so imagine a photo here of a dull, scuffed floor with lots of ugly marks).
This time around we went back to Pergo since we knew it would not let us down. Our choices were somewhat limited because we needed to stick with a laminate the exact same height as the old floor so it would fit underneath the kitchen cabinets and bathroom walls. After much back and forth we chose a warm gray oak that we hoped would brighten our small space. As a bonus, it was in stock at the local Home Depot in Key West.
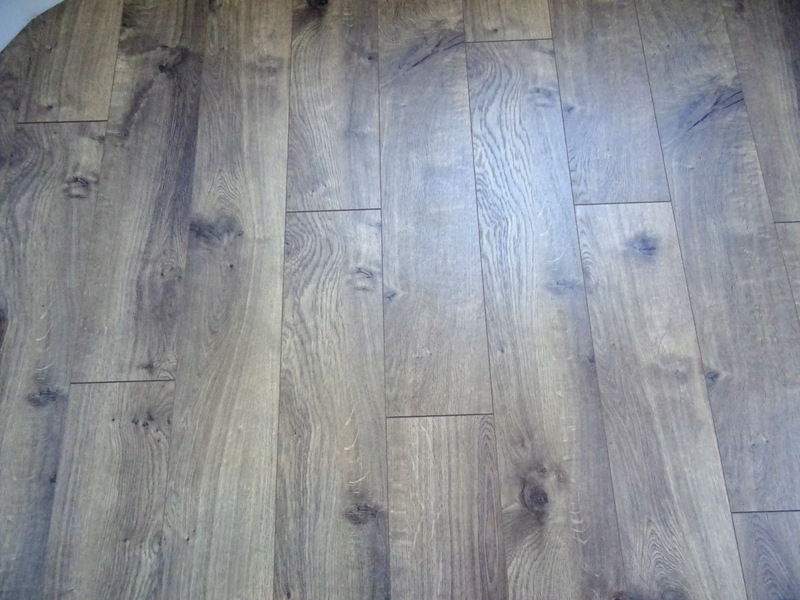
Pergo brand Warm Gray Oak laminate
With the bedroom empty Tim was able to quickly install the new floor. Anyone who has ever installed a floating laminate floor knows how easy it is. You simply place the pieces next to each other and click them together. No glue, no nails, no fuss. A few cuts were needed to accommodate the curved walls and a small area with wires, our city water connection, and water pressure regulator on one side of the room.
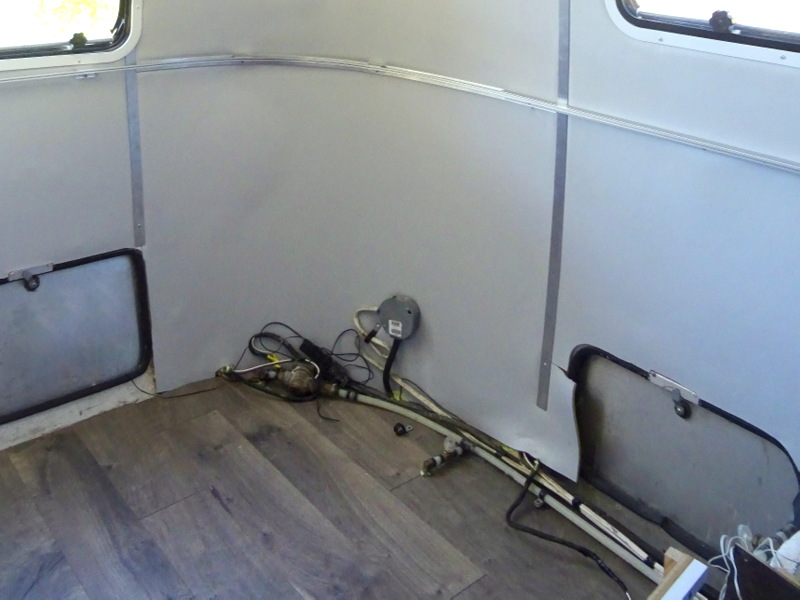
A few things to work around in the bedroom
The hallway was a bit more complicated as the flooring needed to be shimmied under the kitchen cabinets, the large wardrobe, and bathroom walls. The first time around we had removed all the cabinets in the kitchen including the stove and wardrobe, but that seemed unnecessary this time so we left them in place. With a little help from a jack to lift them and a lot of banging to slide them in it wasn’t too difficult.
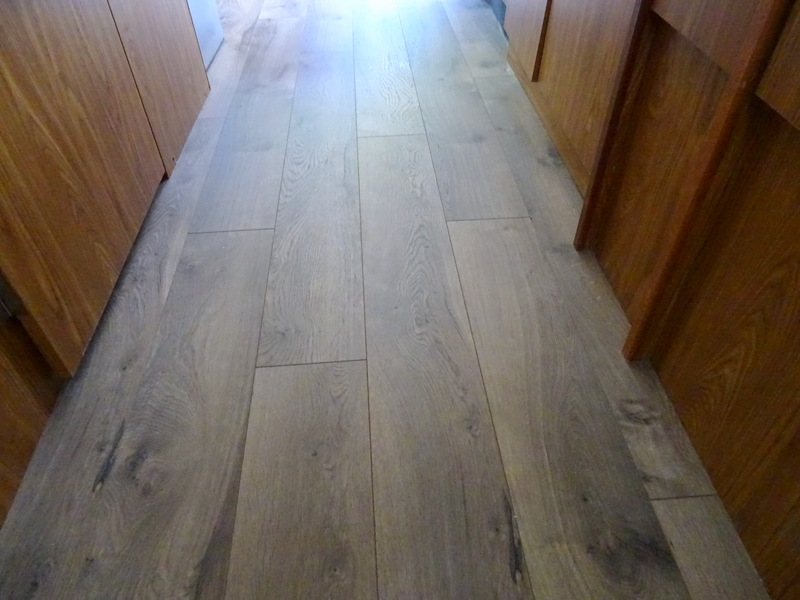
The hallway floor had to be shimmed under the existing cabinets and walls
The bathroom got a new floor as well including a new cover for the riser where our toilet sits. While the toilet was out I took the opportunity to replace the ball and seal which had both failed. I’ll spare you any photos of this project. Let’s just say I hope I never have to get that intimate with our toilet ever again.
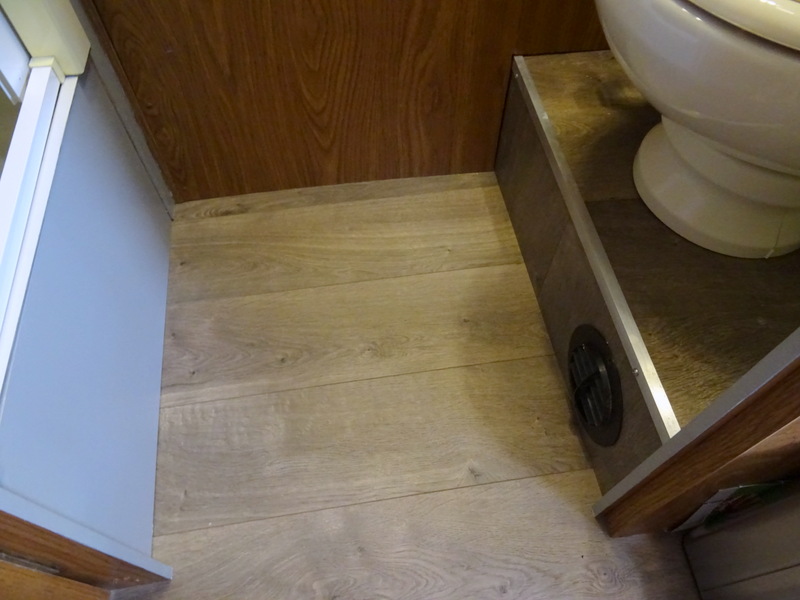
New bathroom floor and toilet riser
Once we finished in the bedroom and moved all the furniture from the front to the back the living room floor went in quickly.

Living room floor complete (plus our new battery box minus the cover)
Doesn’t it look great? After living with it for a week now, I can confirm that the new color and pattern does indeed hide more dirt and we both like the way the texture feels on our bare feet.
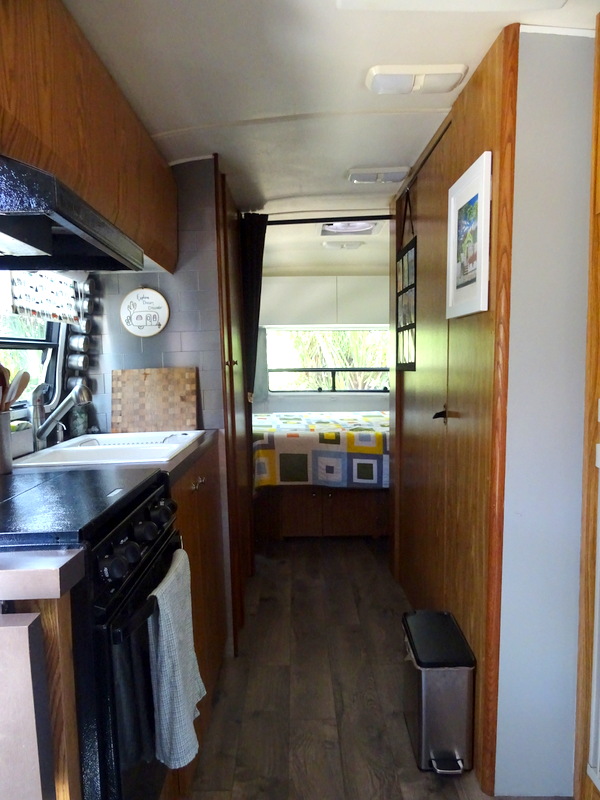
Loving the new floor!
Paint the Bedroom Cabinets
From day one I’ve wanted to paint the Airstream cabinets. While I like the style of them with a smooth front that is void of fussy inlaid details, patterns, or mirror fronts (yes, this really is a thing), I don’t like the fake oak finish. The look is too traditional for my taste and it gives our interior a dated look that clashes with the rest of our furnishing choices. I also feel that this small space could benefit from some lighter colors to make it feel more open. As strongly as I was in favor of painting the cabinets, Tim was against it. It’s not that he loved the original cabinets, but he argued that they weren’t “that bad”. He also pointed out that painting them would hurt the resale value, and most importantly it would be a ton of work. So you can imagine my surprise when he was the one to bring up the idea of painting the bedroom cabinets. Whoo hoo! He finally came around.
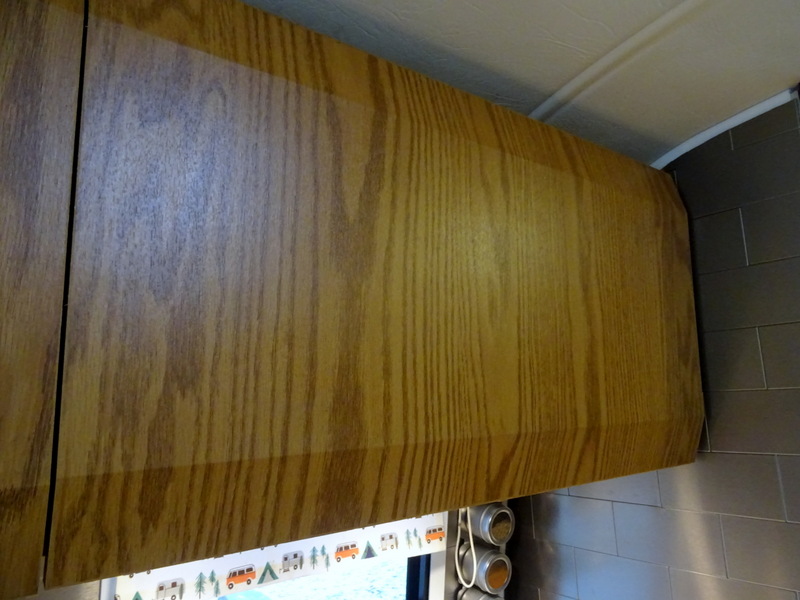
We like the cabinet style but not the finish
Part of the reason is that with this last round of renovations we have abandoned the idea of preserving the original interior of the Airstream in the name of resale value. If we’re going to stick with this Airstream for the foreseeable future (and after many years of back and forth we’ve decided that we will) it only makes sense to go ahead with all the changes that will make it exactly how we want it. Also, let’s be honest, Airstreams are more popular than ever and if we did decide to sell painted cabinets are not going to hurt our ability to find a buyer.
So I painted the long upper bedroom cabinet the goes along the back wall and the small upper cabinet next to the bed. I removed the doors and painted both the inside and outside along with any part of the outer cabinet that was visible when the doors are closed. I didn’t seem necessary to paint the inside of the cabinets so I left them as is.

So bright!
The cabinets were not difficult to paint, but it did take some time. The smooth veneer finish didn’t take to paint well so I had to use a primer plus four coats of latex paint. I chose a semi-gloss because I like the way glossy cabinets look and I wanted them to be easy to wipe clean.
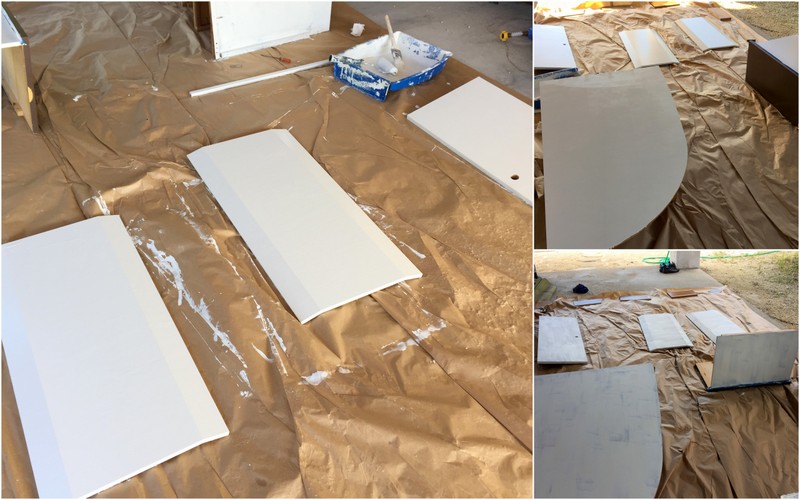
My outside cabinet painting set-up
The end result was pretty fantastic. Our bedroom is now my favorite room in the RV. I love how the bright white cabinets, gray walls, and gray curtains make this small space feel roomy and bright. To counter all that white and gray I recovered the pale green valances in a bright orange patterned fabric that picks up the bits of orange in the quilt I made for us last year.
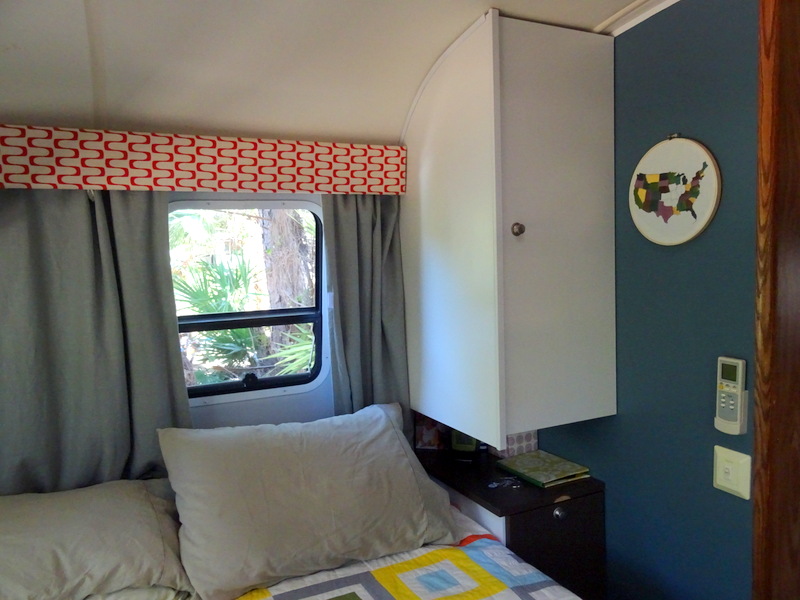
Freshly painted white cabinet contrasts nicely with the dark blue wall and orange patterned valance
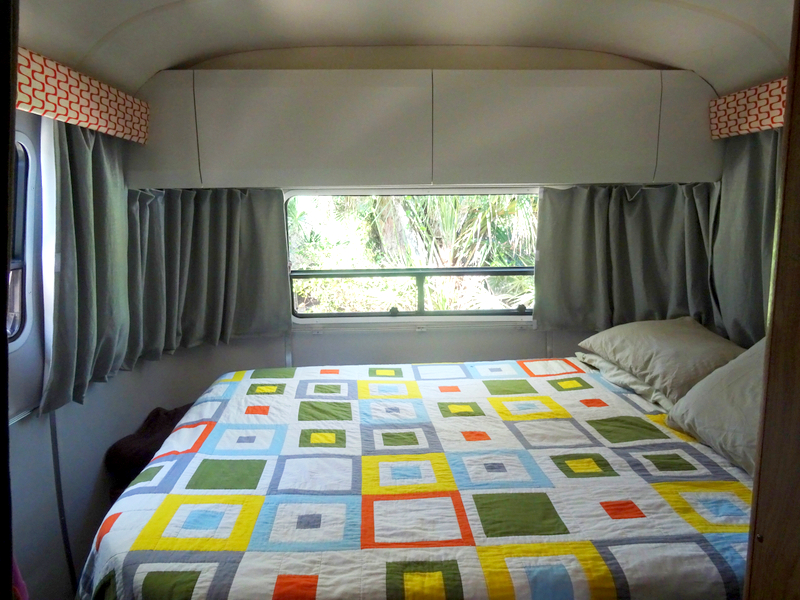
Loving our bedroom!
We like the painted cabinets so much that we’re already planning to do more of them. The next section we want to paint are the outer bathroom walls. These should be fairly easy. We can remove the bathroom door and paint that outside while the two fixed walls on either side can be painted in place. The plan is to paint them a similar gray color to the vinyl walls. I think it will really brighten up the hallway. Eventually, I would like to paint all the cabinets with a combination of gray and white (upper white, bottom gray) but right now we’re taking it little by little.
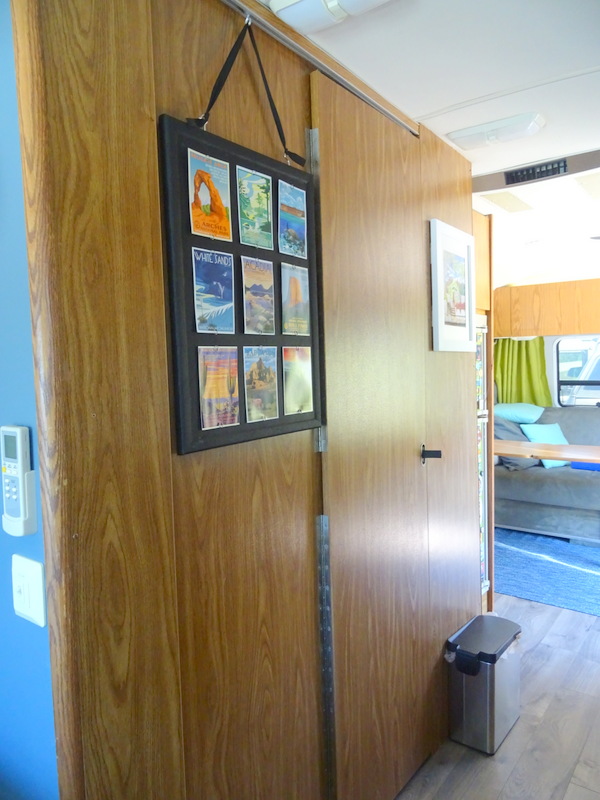
This wall is getting painted next
Raise the Table, Raise the Couch & Add a Tray Table
We’ve struggled with the layout of our living room/dining room/office for a long time. The big problem is that we have a single table and couch that needs to serve multiple purposes. For years we’ve schemed different layouts that would better suit our needs. We have considered replacing the couch with two recliners and a convertible table in the middle (not enough space) moving the couch so it’s against the side wall and putting a small desk on the back wall (would require relocating the batteries and all the other electronics under the couch and credenza, not to mention that the upper cabinets would be in the way), and various other hairbrained schemes. In the end, we decided that the layout we currently have makes the most sense in this space, but maybe a few changes could improve things.
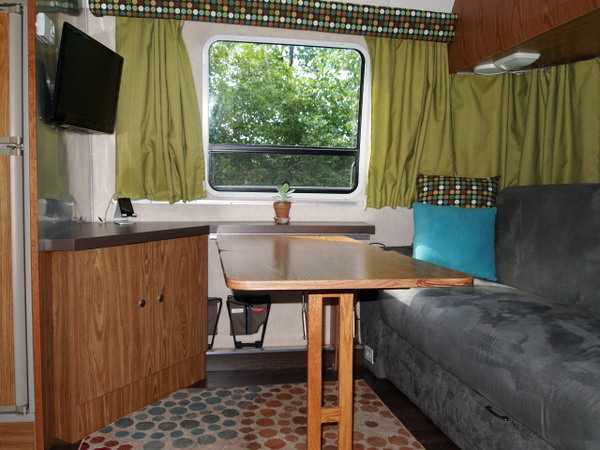
The living room after our very first round of renovations.
First up was raising the table and removing the hinge. The table in our Airstream is actually quite ingenious. Not only does it slide back and forth on a track but it also folds up and stows under the side counter. The problem is that the table can only slide so far until it hits the credenza in the corner. Our normal arrangement is that Tim sits on the far corner of the couch and I sit on the side near the door. The problem with this is that the table didn’t slide far enough for him to get out without me getting up and letting him past. I know that doesn’t sound like a big deal but on most days we spend many hours sitting at the table and that arrangement was tiring for both of us.
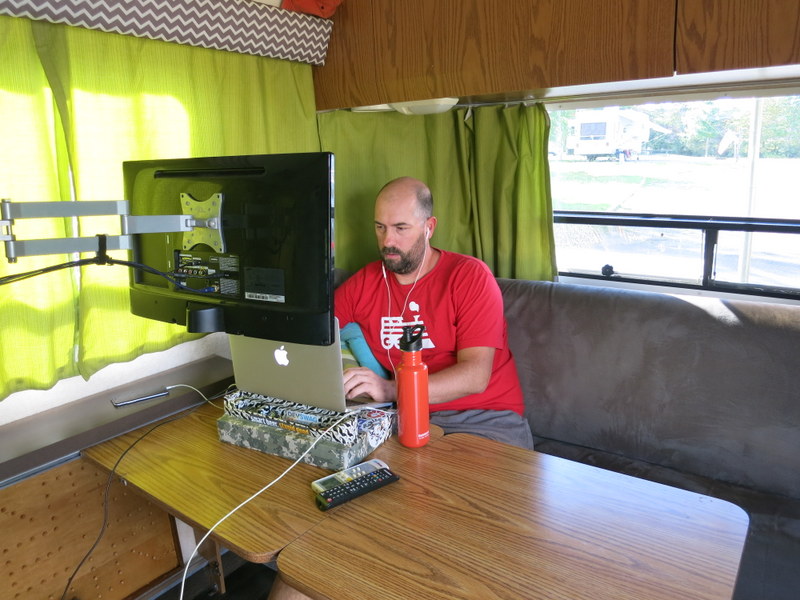
Tim in his “office”. I get the spot next to him
To fix that problem, Tim raised the height of the counter on the credenza so the table could slide underneath. Now it slides far enough so I don’t have to move when he wants to get out. Eventually, the blank space that the table slides into will be covered by a hinged piece of wood that flips up as the table slides in. We ran out of time to finish this project, but I’ll update the post with a photo when it happens.
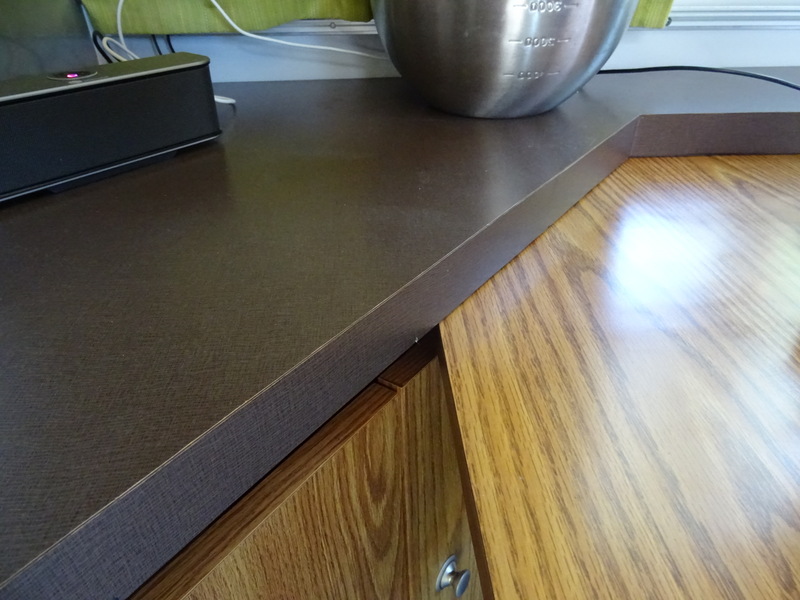
The table now slides under the counter top
Not only did the counter top get raised but the table itself is a few inches higher. This was to accommodate for Mr. long legs who was constantly bumping his legs on the underside of the table.
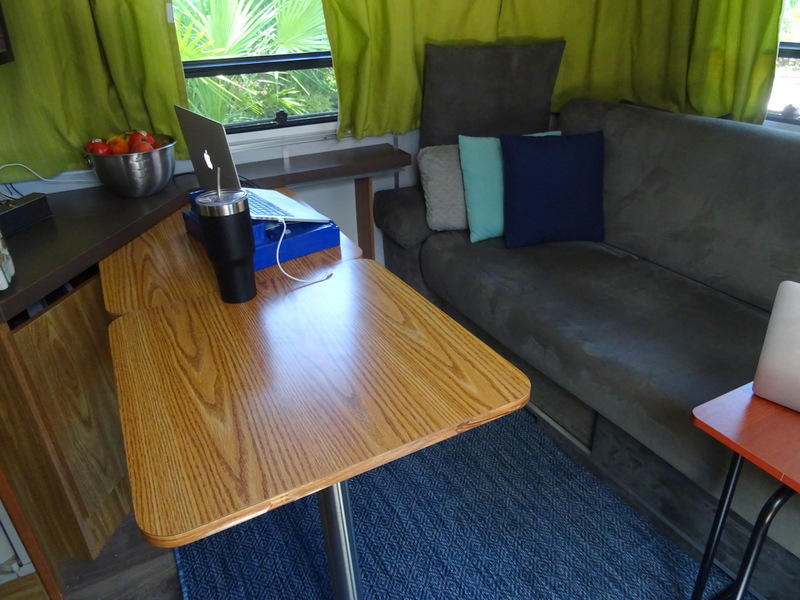
So much more room!
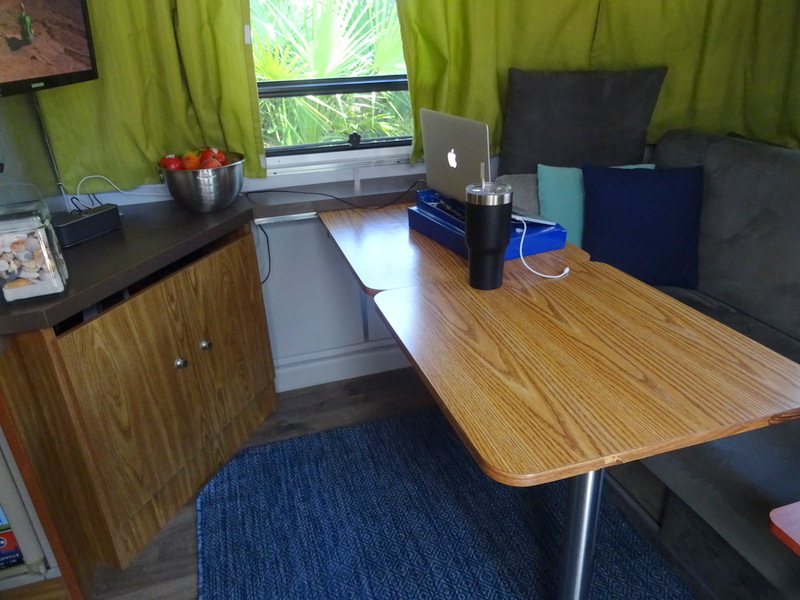
The in-close position allows easy access to the credenza doors
We also created more room under the table by removing the hinge that allowed it to fold up. For the first few weeks of full-timing, we would fold and stow the table every time we went into travel mode. We quickly realized that was unnecessary. Since we stopped converting it for traveI I can count on one hand the number of times we have folded it up. It can slide all the way off on the side near the couch should we ever need to remove it. Since we no longer needed the table leg to fold up and under we were able to replace it with a much nicer looking round metal leg. Now we just need to replace the table top with something better than that ugly oak. I would love a sleek metal (maybe stainless steel) table top but have yet to find one that’s the right size.
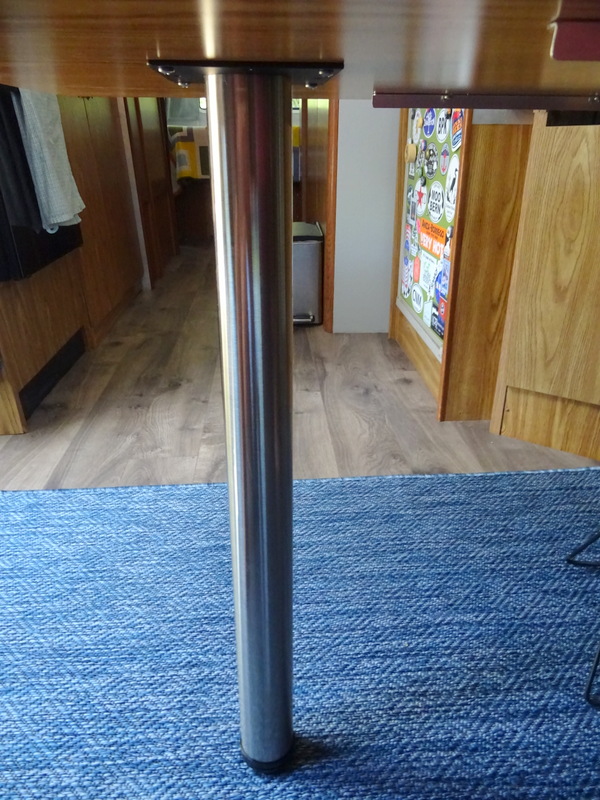
New table leg
The final part of the living room renovation was a new, separate table for my side. The big table only reaches a little more than halfway across the couch which means we have to sit pretty close to both use it. This is fine for meals, but if I’m spending hours on the computer I really don’t want to sit four inches from Tim (or anyone for that matter). It also means that we were constantly at odds regarding how close or far we wanted the table. We have long played with the idea of installing a second smaller table attached to the wall on my side that folded down when not in use. I think we could have made that work, but it would have been a very involved project. Fortunately, an easy solution presented itself in the form of a cheap $20 tray table that we bought from Amazon to use in the rental house. I liked the table so much that Tim devised a clever way for me to use it in the Airstream. (This exact table is longer available on Amazon, but here’s a link to a similar one).
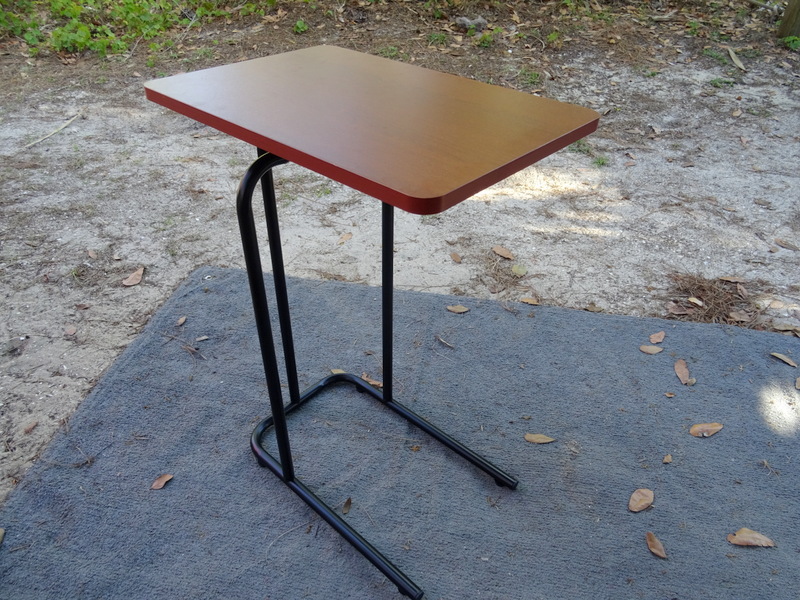
Tray table
Since the metal table legs are designed to slide under a piece of furniture and our couch rested on the ground we simply needed to create an area under the couch for the legs to slide into. It sounds like a big project, but it was actually fairly simple. The area under our couch had a space for three rectangular storage bins. To access the bins we had to lift up the couch slightly and pull down a long door so the bins could slide out. There was more than enough room under the couch for the bins so Tim simply raised them up on a platform (made from leftover flooring) which created a space for the table legs to slide underneath.
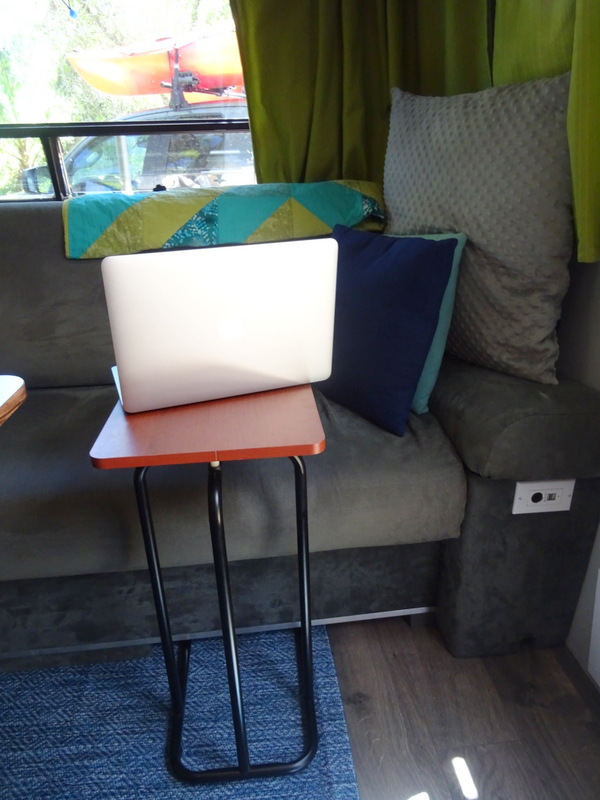
My new table slides nicely under the couch
The existing door was cut in half, one side was extended by a few inches and then re-covered with couch material. Thankfully, I had saved the leftover material from when I recovered it years ago. Two metal u-channels function as a track and the doors now slide past each other when we want to access the bins. Not only does it look slick but it’s also easier to open then the hinged door.
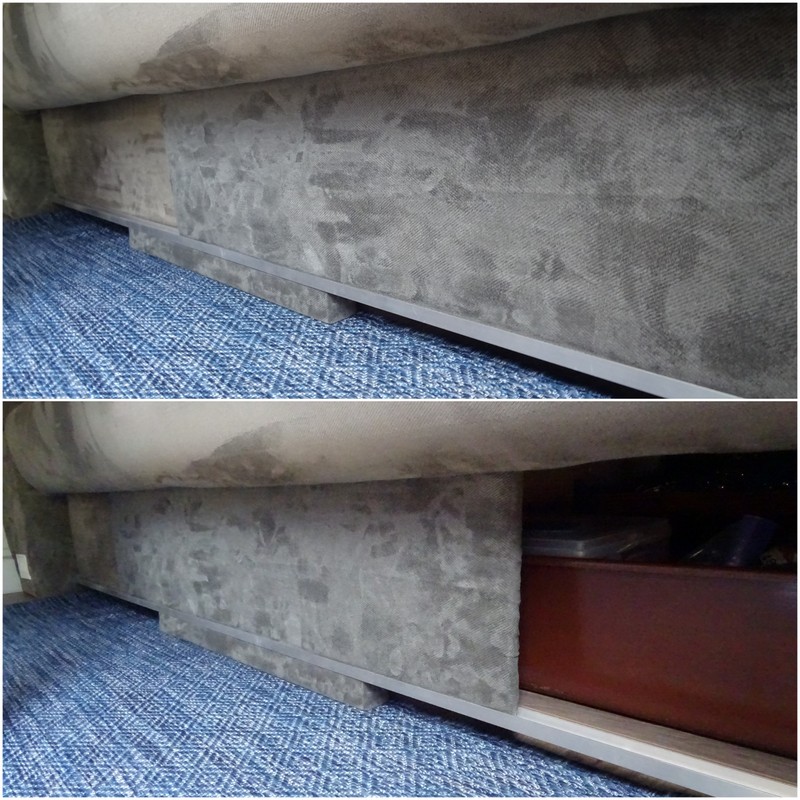
Raised under couch storage
The final step was to cut a hole in the side compartment of the couch (another storage area) so the table leg could slide in there when I wanted to store it out of the way. Pretty genius right?
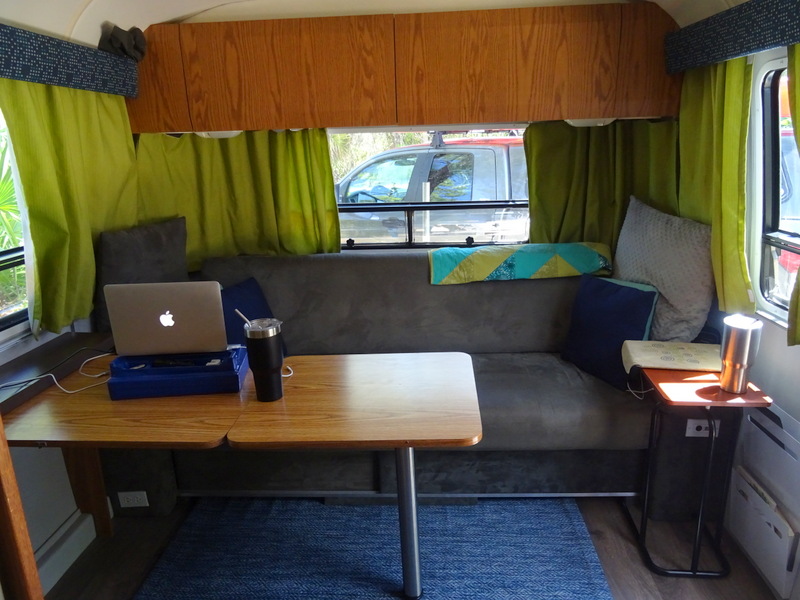
In side table mode
This solution has made a huge difference. Not only do I have my own table now, but I also have a side table to place things like a drink or a book.
New Outlets & Cabinet Latches
Included in our master list of renovations and fixes were a few small projects that we hoped would make a big impact. Number one was the addition of more 12-volt outlets. We run most of our electronics off 12-volt power. It’s easier when we’re dry camping and means we don’t have to use the inverter very often. The Airstream only originally had a few 12-volt outlets that were not in the most convenient places. We also had two outlets in the bedroom with one 12-volt plug and one cable plug. Since we don’t watch TV in the bedroom this was a complete waste.
Tim replaced both these outlets with new ones that contain one 12 volt plug and two USB ports. I also got a matching outlet in my couch-side compartment. Since I store my computer in the magazine rack next to the couch this outlet was much needed. Now when we’re dry camping I can plug in my phone and computer right next to where I sit. The final new outlet was installed under the cabinet next to my side of the bed. Perfect for charging my phone, my Bluetooth headphones, and my Kindle.
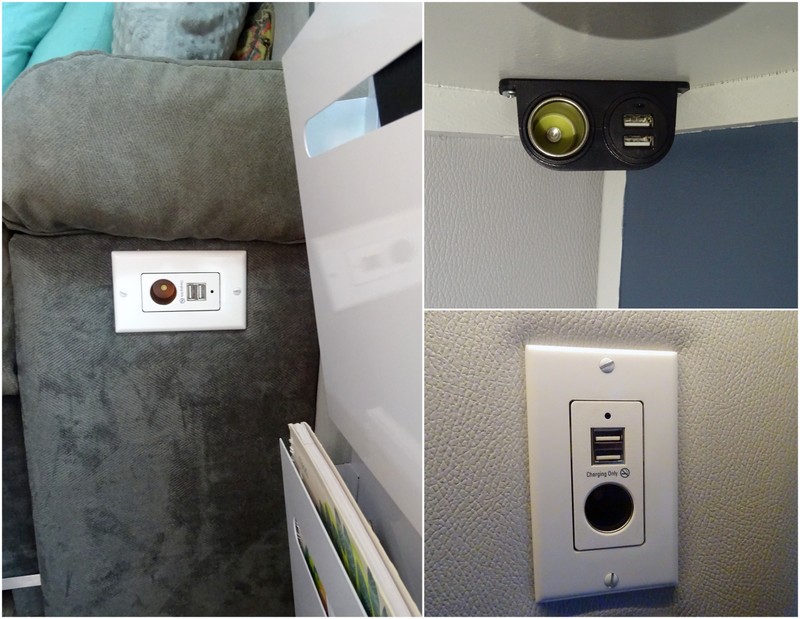
New 12-volt outlets
The other electronics project was new touch dimmers for the valances lights. During our first week in the Airstream Tim installed LED strip lights behind the valances and above the upper cabinet in the living room. Since then we’ve been using them as our daily lights. We both like dim lights at night and the overhead lights are simply too harsh. We’ve gone through a few dimmers over the years, but this latest one — the HERO-LED Mini Touch Dimmer — is by far the best. Not only is it small and inconspicuous, but to control it you simply touch to turn on and hold to turn up or down. Also, with the walls exposed Tim was able to run the wire over near the door so for the first time we can turn on the strip lights when we walk in the door. Sometimes it’s the little things that make a big difference.
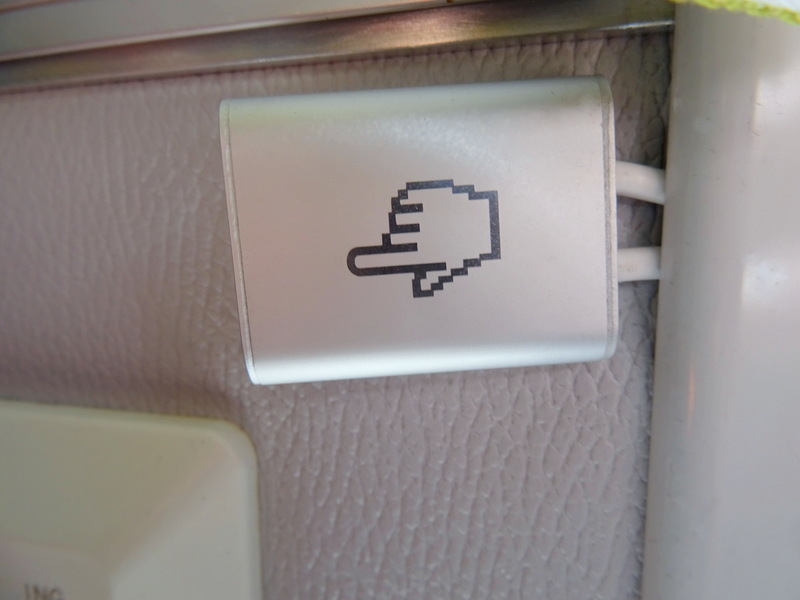
Touch the dimmer anywhere to turn on/off or to adjust the settings
Moving away from electronics, we installed new struts on all the upper cabinets. The original ones were a metal bar that slid in and out of a plastic piece with a mechanism inside to hold the cabinet door in an upright position. Unfortunately, the plastic part had a tendency to malfunction which caused the door to come crashing down on your head — not ideal. The first new strut we tried looked nice but it wasn’t quite right. In short, it did too good a job of holding open the door and required a bit of strength to close. In fact, it had so much force that it misaligned a few of the cabinet doors. It also didn’t allow the doors to open far enough.
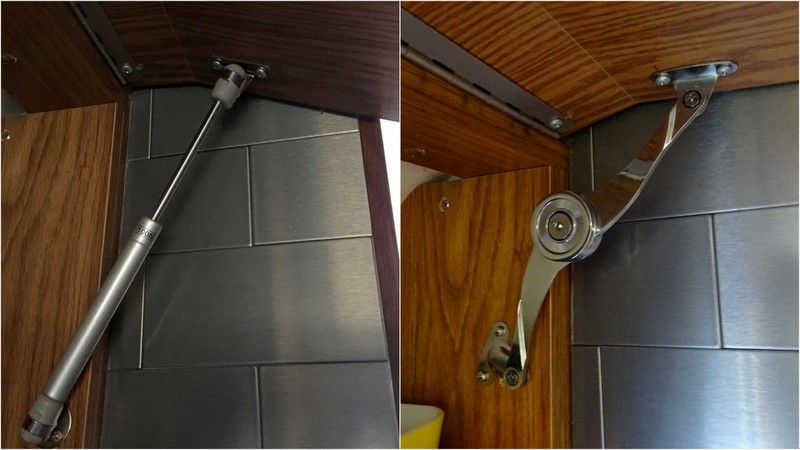
First attempt on the left/ Second attempt on the right
Next, we tried ASIBT Door Cupboard Closet Furniture Lid Lift Up Flap Stay Support Hinge Buffer (that is quite the name) which the jury is still out on. They look nice, don’t take up too much room inside the cabinet and hold the doors up nice and high. The problem is that they have a tendency to loosen which causes the door to slowly lower. You can tighten them, but if that’s something we need to do on a regular a basis it will be a deal breaker.
Painting the Bumper and Wheels
When we originally sat down to make our master winter renovation list we had a number of outside projects. There was painting the bumper, replacing the broken stove vent, painting the hitch, painting the wheels, and re-polishing at least part of the Airstream. As we got deep into the interior projects it quickly became apparent that we wouldn’t have time for most of the outside projects. Fortunately, we did complete two of them before we started on the inside.
First up was painting the bumper. This was a pretty simple job that required removing the various bumper pieces and spray painting them with black Rustoleum paint. This was my project and in the process, I learned how to remove and install rivets which was fun.
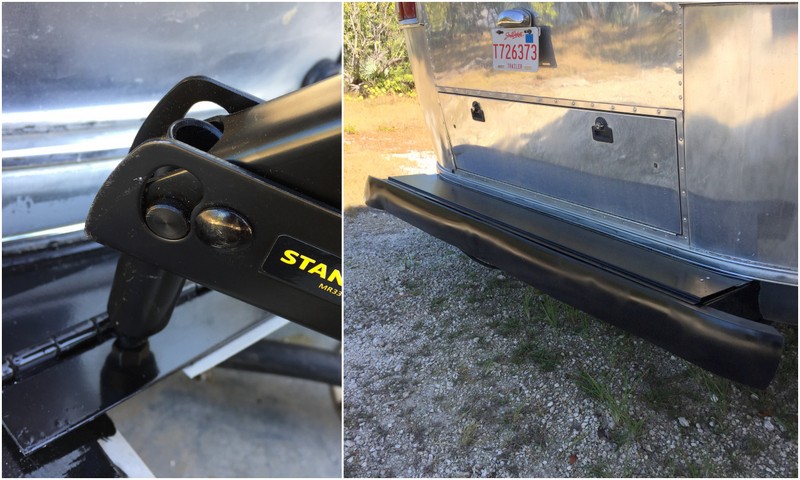
Learning how to rivet and our shiny new bumper. The waviness is due to a small incident we had while boondocking in Colorado. I think it gives it character.
Tim tackled the wheels which were in desperate need of paint. It was kind of a tedious project because he had to strip off the old paint and then tape off everything to repaint them. The end result was well worth the effort.
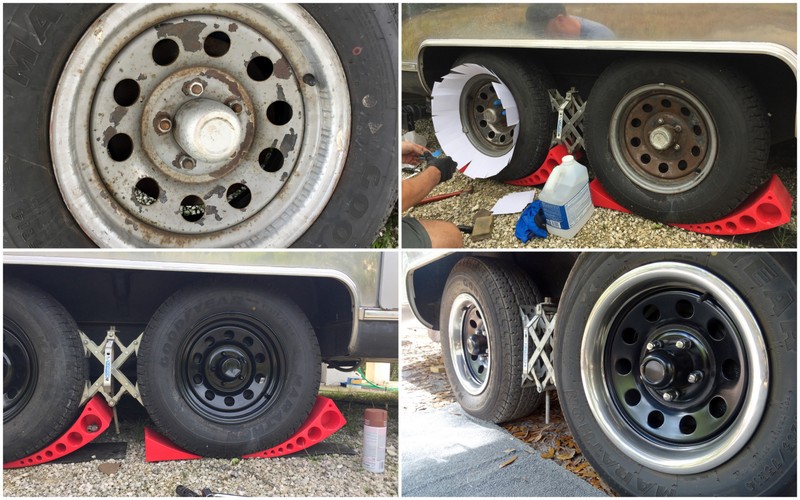
Our wheels went from ugly to snazzy!
As for the other outside projects, we purchased the new stove vent but have yet to install it. The hitch project got part way done, and now we just need to find time to finish it. As for the polishing, it looks like we’ll be doing another round of desert polishing next winter.
Finishing Touches
We made a few decorative changes to complete the renovation. First, we got a new rug for the living room. The old rug was still in good shape, but since I changed the living room valances and pillows in November the old chevron pattern no longer matched. This time we went with a dark blue rug that coordinates nicely with the valances. I learned long ago that we must have an indoor-outdoor type rug in here. Even with no pets and a “no shoes in the house” rule, we still manage to track in tons of dirt. The rug was a bit big for the space so I had to do a little surgery using scissors and a roll of heavy duty nylon floss.
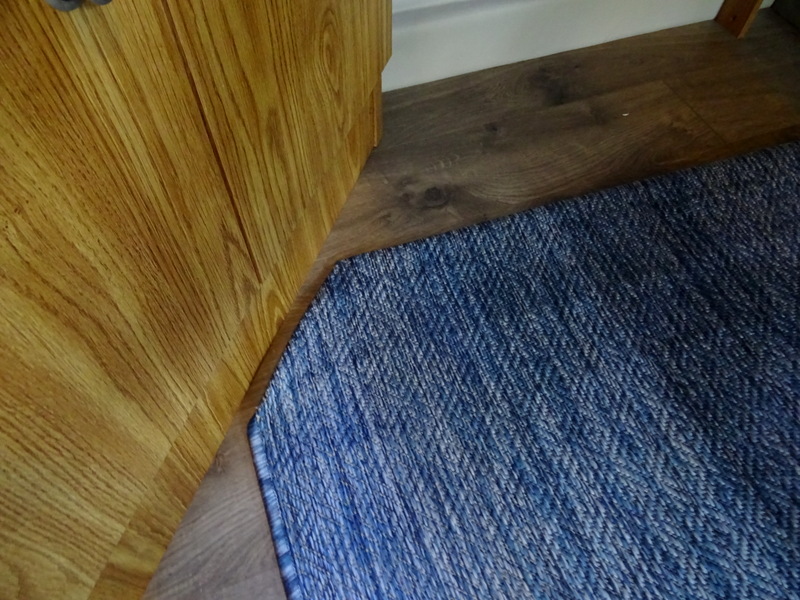
The carpet needed a little modification to make it fit
The other decorative change was to change up some of the artwork. Some of you will remember that several years ago I devised a way to display our national park postcard collection in individual frames. It worked out well aside from a frame falling off every few months (somehow no glass ever broke). As our postcard collection grew I would occasionally change them out so we could look at the new ones.
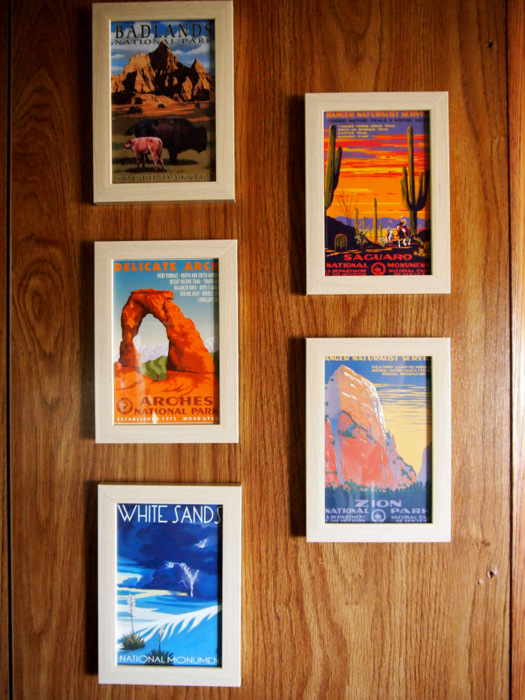
The old postcard display
We’re going to continue visiting new national parks though and I wanted to find an easier way to switch out the cards. A bulletin board seemed to be the obvious solution but I not only didn’t like the way they looked but I also didn’t want to poke holes in our post cards. After scouring Pinterest for ideas I decided to cover the board with a thin layer of black fabric. I then found some really clever no-hole push pins online and we now have a new way to display our postcards.
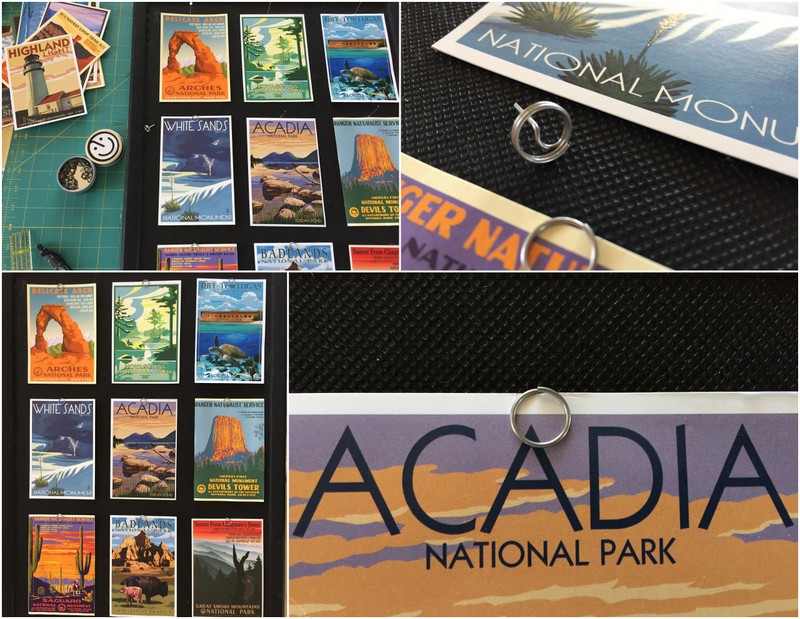
National Park postcard display
To hang the board we screwed in hooks and hung it from two eye hooks inserted in the old bathroom door track (which we stopped using years ago and replaced with a hinged door. To keep it from moving while we’re traveling I put two pieces of 3M velcro at the top and bottom of the board
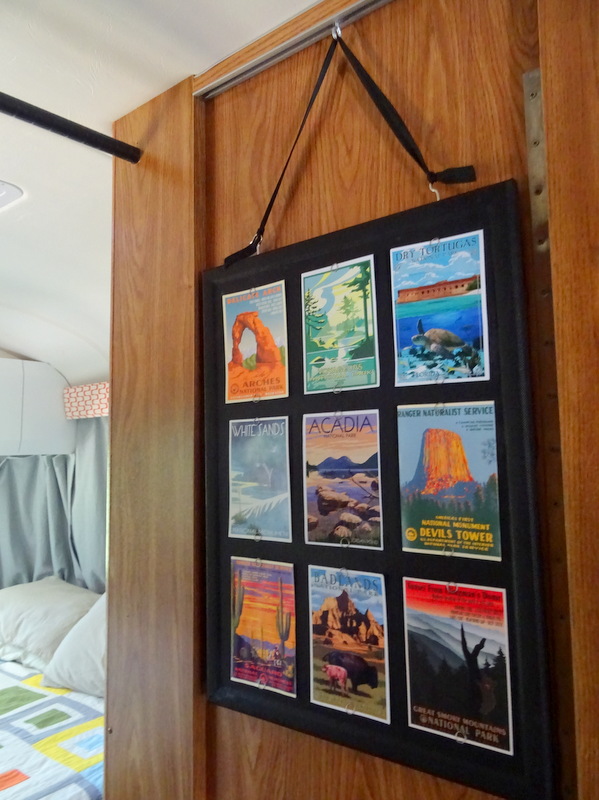
In it’s home in the hallway
Finally, we added to our collection of local art with this gorgeous print from Key’s artist Abigail White. I fell in love with her artwork the first time we were in the Keys and knew I couldn’t leave this time around without purchasing one of her pieces.
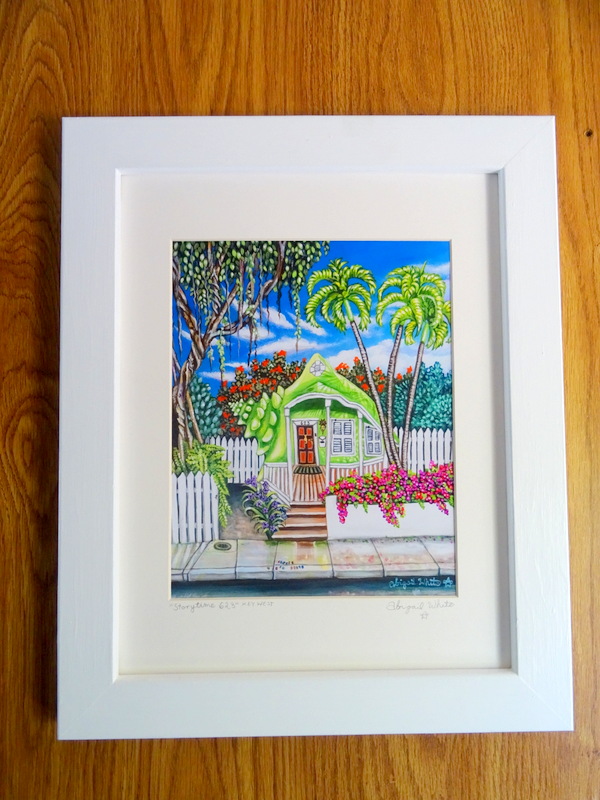
Lovely artwork by Abigail White to help us remember our time in the Keys
Phew! If you’re still reading thanks for sticking with it, I know this was a long post. Believe it or not, I even left out a few things — like how we replaced the foam in our couch, used three cans of spray foam under the floor to hopefully keep the mice out, purchased a new memory foam mattress and cut the corners to fit, painted the inside of bathroom medicine cabinet, purchased new door shelves for our fridge, put up new clothing hooks in the bedroom, and gave the stove hood a fresh coat of paint.
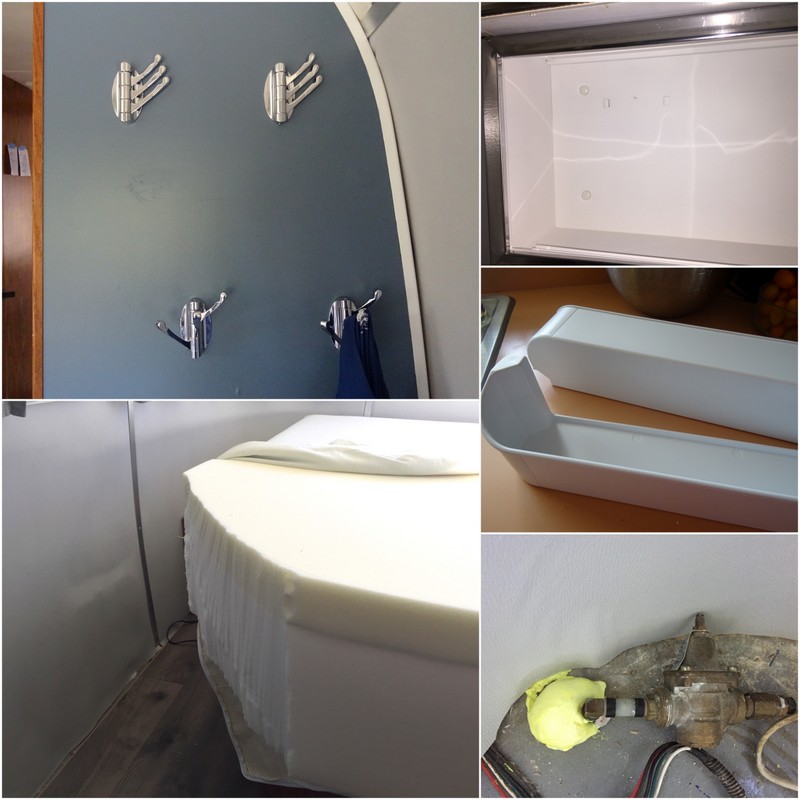
Various other improvements
As always, if you want to see all the Airstream updates we’ve done since the beginning click over to our What Page. I will be updating it soon with this latest round of improvements.
This post contains Amazon affiliate links. We receive a small portion of funds when you purchase items through these links. The price you pay is the same, and all the money goes to support this blog. Thanks so much for reading and following us on our journey!

48 comments
Whew! It looks fabulous though and I know you’ve got to be thrilled with it. Also very happy that you’ve (Amanda) finally gotten your own dedicated work space. That makes all the difference in the work day and it looks like a great solution. Good job guys! P.S. Wanna do ours now? ;o)
Yes, the new table has made such difference. Amazing how such a small thing can make such a big difference.
You guys are talented! What a great job on all of the upgrades and renovations. We’ve been doing a lot of home improvement projects while we’ve been stationary this winter, but nothing of the magnitude that you’ve undertaken!
Thanks Laurel. We seem to have a problem with home improvement projects. We always start out doing small things and somehow they morph into big things.
Amanda – It looks amazing! You two did an excellent job. Thanks for sharing and I hope we get to see it in person one of these days!
Shannon and Dave
Thanks Shannon! We’re on our way west so hopefully we’ll cross paths with you guys again this year.
Wow! We’ve considered making some changes in our 5th wheel and this post has served as inspiration. Great job!
Happy we could provide inspiration!
As the owner of a ‘beige on beige with hints of brown’ Class A, I am always super jealous of folks who have these gorgeous, modern, bright, Airstreams. It was obviously a ton of work, but it really looks fantastic. Nice job! (And I may steal your postcards idea. What a great way to decorate without causing permanent damage AND be able to easily change up the decorations every couple months. Awesome!)
Ha! That seems to be a reoccurring theme in so many RVs. It’s like the manufacturers are afraid of color. You should totally steal the postcard idea. It was super easy and I’m very pleased with how it came out.
Holy Moly! That is a LOT of work and it looks fantastic! You guys are so talented at this home remodel work! Awesome job!
Thanks Lisa! Compared to all the house renovations we’ve done in the past it’s always easier in the Airstream where everything is a much smaller scale.
Love this post. And that the bedroom is your ” favorite room in the RV”. You guys are great.
Thanks Lynda :)
This looks incredible! Great work, you two!
Thanks Marie :)
Wow! Can’t wait to see it. Already thinking of what we can do to brighten up our space. I’ll probably wait a bit though. I totally agree with the comments of how talented you both are. Always a creative, unique solution
Can’t wait for you to see it too!
Your renovations look fantastic… hope all the hard work creates you a comfortable living space going forward!!
Enjoy Koreshan as well (noted it as your current location). We stayed there last month before closing on our boat. Such a lovely park! If your travels are taking you northward, we’ll be around Punta Gorda for a bit.
Thanks Cherie! Sadly, we’ve already passed you (our current location is a bit behind) as we quickly make our way north.
Long time lurker, first time commenter… We’ve been anxiously awaiting your post for what you replaced the mouse fur with! We’re updating an Airstream (2005 Bunkhouse), just finished flooring, painting all cabinets/bathroom, new curtains (followed your old post on that!), updated valences, cushions, etc. We did paintable/textured wall paper everywhere except the back bedroom since it has the inward curve. THANK YOU for your post – we are going to give the foam backed vinyl a try in the next few weeks! Your old posts on updating the Airstream gave us what we needed to dive in. Planning to be on the road full-time in 2018 and can’t wait :)
Wow, sounds like you’ve done a lot of work! So happy that we could provide some inspiration. I didn’t find much useful info online about other people replacing the mouse fur walls so really wanted to share our process. Good luck with the vinyl! And let us know if we’re every nearby when you go full-time.
Great job, been waiting to see how it turned out……Dave
What size was the foam backing on the marine vinyl? ? 1/4 inch? Thanks, -Ryan
Yes, the vinyl is a 1/4-inch thick.
Thanks! and was 16 yards just about right for the project?
We ordered another 8 yards in the middle of the project but only ended up using 2 of it (not sure what we were thinking). We did have to re-do one panel in the back and used some extra for padding on the new valances/etc. You could do it with 16, but a few more yards extra wouldn’t be a bad idea.
We’ve been living the airdream for a while now, and the bedroom walls are the last big hurdle I’ve been putting off. Thanks for posting all your work.
Can’t wait to see how it comes out!
Pretty much finished! Thanks for great advice :-)
https://airdreaming.com/2017/05/14/mouse-fur-replacement-re-imagined/
Y’all done a fabulous job,I gutted mine also,and just a quick question,I’ve tried everything trying to hang a picture on the wall and nothing I’ve tried works,glue of all types and nothing works,so can u please tell me something to use,command strips don’t work on the aluminum either.thanks.,and again,y’all done a fabulous job.
try thoroughly cleaning the alum with alcohol before applying the command strips to metal. also the temp need to be warm as in above 60 degs. i find. they should work well on any clean non porous surface be it painted, wall paper, or metal.
Thanks for the great advice Carl. I agree that cleaning the surface well beforehand is the key to success. We’ve had good luck with the command strips on our painted cabinets and walls. Even on the bumpiest roads when doors fly open and the laundry basket migrates from under the bed, not a single thing has ever come off the walls!
While I have you.. We are looking at doing some interior changes in our 2005 classic.. We want to get the dinette out and install that sliding table set up you have.. I understand that is a stock deal with your year trailer and I love the way you were able to modify it to slide further forward? and make it a bit taller for mr long legs. :) I’m thinking it is some kind of slide deal like on hanging doors. We have several “sliding doors” now on bedroom and bathroom doors.. Do you have any photos of the slides you can share?? just trying to figure out how ot works and folds down at some time..
We follow a couple on youtube, less junk more journey and did some like what we want to do but reused the existing table, but it shorter and mounted on wall with ability to fold up and down but in front of sofa so it is not like a real table.. (too far forward when you are sitting on sofa in front.
link to post showing dinette removal. https://www.facebook.com/groups/AirstreamAddicts/permalink/2222592831341051/
thanks a million and happy new year to you guys.. :) if you want to send pic to email please do..
Beautiful job. Where did you get your couch and does it pull out for a bed?
The couch is original to the Airstream. We took it apart, replaced the foam, and recovered it with new fabric. It does fold out into a bed, although actually sleeping on it in bed mode would lead to a terrible back ache!
Hows the vinyl wall paper holding up with the spray on adhesive? I am fixing to do something similar with a 1967 Sovereign.
The vinyl is holding up very well. It’s been almost two years since we installed it since then we’ve lived through all kinds of temperature swings (hot, cold, damp, dry) and not a single piece has come loose. While it was a lot of work, we remain happy with the choice of both the vinyl and the method we used to install it.
Wow, really looks great. Getting ready for updates on our 87 Sovereign and love all your great advice. I have been looking online at your Great Lakes Skipper vinyl recommendation. Can you possibly tell me the exact name and order number of the texture and color you chose? I have already ordered some samples from them but they are way off and the one you picked looks like a perfect bright gray!! Thanks so much in advance!
Sorry your comment got lost in the holiday madness! The vinyl we used is called Spadling Boat 1/4-inch foam back Elk Grey 54″. The number is 1062773. Good luck with your renovations!
Not sure if you still monitor this site or not. We are experiencing the exact same problem in our ’05 Safari. We ripped out the linoleum floor and the mouse fur. We have your foam backed on order. (very excited) In regards to the floor. We are doing the same process with click flooring as you did. We had to remove everything in the front and back…but the bathroom and shower/fridge sections remain in place. (Which we will have to cut around. When you did the install…did you lay down the flooring on one side of the room and work your way to the other side? Or did you start from the centerline and work your way to the walls. Also, what did you use to cover the edges? I think you’re supposed to leave 1/4″ gap. Regular trim wouldn’t be able to go around those curved walls.
Great job on the renovation. Thanks for your time.
George and Amy Smith
Yay for new walls and flooring! When installing our flooring we started in the middle and worked our way to the walls on either side. We were able to slide the floor under the bathroom and fridge walls because there was already a gap left from the old flooring, therefore, we had no need to cover the edges. There are a few small areas in the bedroom and between the front door and couch where the floor butts up against the walls. For these spots, we trimmed the floor carefully to leave a small gap for expansion and contraction but not big enough so it needed to be covered by any sort of trim. Since we alternate between humid and dry climates the floor does have a tendency to shrink and expand depending on where are so I would recommend leaving some space for this to happen. Good luck with your reno!
I know someone asked in 2018, but curious how the 3m 90 is holding up for the wall covering. I’m getting ready to do some sprucing up in 1975 Argosy motorhome, and I keep second guessing the 3M 90 and thinking about going with Roman 880, 838 or 555 wallpaper adhesive. I have used the 3M 90 on *many* other trim products and panels, and my concern is that it doesn’t always hold up in high heat (like when an Airstream sits unused in Arizona summer heat for a couple months). Thanks!
After a few years of living with it, I can report mixed results with the 3m 90. The two curved panels in the back have some air spaces behind them where the glue failed. Fortunately, both areas are behind the curtains so it’s not noticeable and the metal trim pieces combined with the curtain rails are keeping the vinyl in place. We’ve had no other issues in any other areas including the curved panels in the front which leads me to believe that the issues in the back may have more to do with our own installation errors than the glue itself. These were the first panels that we glued and our method might not have been the best. Since the installation, we have mostly lived full-time in the trailer but we did have two stretches of several months each when it was stored during the summer in the humid northeast and in the winter in the southwest. I hope this helps your decision and good luck with your Argosy!
I am 75 and living a vicarious life thru you two. I am in the Palm Springs area wishing I had done what you guys are doing. Thanks for posting
Thanks for commenting and following along Linda!
Would like to purchase the vinyl and give the walls a try. Have you had any issues with the vinyl not sticking through time?
Hi Diana,
Since we installed the vinyl back in 2017 the only issue we’ve had with lack of stick is in the back bedroom corner where we had the initial issue. No other spots have come unstuck. The Airstream has been in all sorts of situations and climates since then ranging from hot and dry for months, to freezing temps, to constant damp here in the PNW. So far, so good and that one spot in the back is always behind a curtain and kept in place by the curtain rails so it’s not noticeable or at risk of falling off the wall. Hope this helps!